OpenBRM 26.0.0 is a complete platform modernization — Grails 2.4.3 to Grails 6.2.2, Java 8 to Java 17, running on Spring Boot 2.7.18 with a bundled Tomcat 9.0.83 and PostgreSQL 18.
New in this releaseEvery major layer of the application changed: build system, persistence, security, web services, reporting and deployment packaging. Start with the Release Notes, then review Breaking Changes & Migration before upgrading an existing installation.
What’s New in 26.0.0
Component
Before
After
Java Runtime
Java 8
Java 17
Grails Framework
2.4.3
6.2.2
Spring Boot
Not integrated
2.7.18 (full application lifecycle)
Build / run command
grails run-app
./gradlew bootRun (Gradle 8)
Deployment target
Tomcat 8.0.5 (Grails plugin)
Tomcat 9.0.83 (bundled in distribution)
Database
Hypersonic / mixed vendors
PostgreSQL 18 (H2 and HSQLDB removed)
The full table of platform changes is in the Release Notes.
Users
The information provided in this section applies to openbrm’s Community Edition. Below is a brief description of what each page covers in the User Section.
User Guide
A link to download the pdf User Guide for openbrm’s Community Edition is available on this page. The User Guide provides a detailed and concise breakdown of all the functions of the system. It is broken down into fifteen chapters, followed by appendices.
Installation
Step-by-step instructions for installing OpenBRM 26.0.0 from the binary distribution on Windows, Linux and macOS: requirements, extracting the package, creating and restoring the PostgreSQL database, setting JAVA_HOME and OPENBRM_HOME, and starting the bundled Tomcat server.
Getting Started
This page is highly recommended to all new users of openbrm! The Getting Started Guide uses a fictional company example to help familiarize users with the basics of the system. Three of openbrm’s main features are covered here: Entering your Customer’s Data, System Configuration, and My First Invoice.
Custom Business Logic
Custom business logic is easily handled through the management of plug-ins. Provided here is a guide to setting up plug-ins to meet the specific custom logic of your business needs.
Database Guide
OpenBRM 26.0.0 runs on PostgreSQL. This guide covers the datasource properties in application.yml, the HikariCP connection pool, initialising a database from the shipped base_database dump, and the Hibernate 5.4 / GORM 7 behaviour changes that came with the Grails 6 migration.
Translating Openbrm
As openbrm is used all over the world, one of its best features is the ability to configure different elements based on the needs of a country. Follow the steps to add a new language to the system by translating the text in two files.
Payment Processor
While there are many payment plug-ins bundled in with openbrm, this page provides a concrete use case. Here you will find instructions for configuring the payment plug-in used to submit payments with Intrannuity.
OpenBRM 26.0.0 is the most significant release in the product’s history — a complete platform modernization from Grails 2.4.3 to Grails 6.2.2, running on Java 17 and Spring Boot 2.7.18. Every major layer of the application was touched: the build system, persistence, security, web services, reporting, and deployment packaging. The result is a billing platform built on a supported, modern foundation that will carry the product forward for years.
The table below shows every core platform version that changed in this release.
Component
Before
After
Java Runtime
Java 8
Java 17
Grails Framework
2.4.3
6.2.2
Spring Boot
Not integrated
2.7.18 (full application lifecycle)
Spring Framework
4.0.5.RELEASE
5.3.x (via Spring Boot 2.7.18)
Groovy
2.4.x (bundled with Grails 2)
3.x (updated compilation pipeline)
Build Tool
grails run-app
./gradlew bootRun (Gradle 8)
Grails Gradle Plugin
— (BuildConfig.groovy / Ivy)
6.2.3 (Gradle 8)
Deployment Target
Tomcat 8.0.5 (Grails plugin)
Tomcat 9.0.83 (bundled in distribution)
WAR Packaging
Standard WAR
Standard WAR
Servlet Namespace
javax.servlet.*
javax.servlet.* (Tomcat 9 — not jakarta)
New Features
Beyond the migration itself, this release introduces several new capabilities that were not possible on the Grails 2 platform.
Live API Documentation
SpringDoc OpenAPI UI 1.8.0 provides a live Swagger UI at /openbrm/swagger-ui.html — no static API docs to maintain.
Annotate controllers with @Operation, @ApiResponse and @Parameter (from io.swagger.core.v3:swagger-annotations 2.2.15) to document endpoints inline.
The OpenAPI JSON spec is available at /openbrm/v3/api-docs for integration with API gateways or client generators.
File Transfer Integration
Spring Integration FTP 5.5.5 enables automated file ingestion workflows over FTP.
Spring Integration SFTP 5.5.5 adds secure (SSH-based) file transfer support.
Both are ready for configuration via Spring Integration DSL — no custom FTP client code needed.
Enhanced Reporting
Apache POI 5.2.5 enables Excel (OOXML) report generation — billing exports, account summaries and batch reports can now be produced as native .xlsx files.
JXLS 3.0.0 + Jamal 2.8.2 support XLS template-based report generation — design a template in Excel, populate it at runtime.
Apache Velocity 2.3 with velocity-tools-generic 3.1 provides a full template engine for email notifications and document generation.
Binary Distribution
The build now produces openbrm-26.0.0.zip — a complete binary distribution with Tomcat 9.0.83 bundled. No separate Tomcat installation is required for standard deployments.
Custom startup/shutdown scripts (startup.sh, startup.bat, shutdown.sh, shutdown.bat) are included and take precedence over Tomcat defaults.
A WAR-only distribution (openbrm-26.0.0-war.zip) is also available for teams with their own Tomcat infrastructure.
Metrics & Monitoring
Micrometer with a Prometheus registry exposes application metrics at /actuator/prometheus.
OSHI Core 6.4.6 surfaces operating-system and hardware metrics through Spring Boot Actuator.
Bug Fixes
The following issues were resolved as part of, or alongside, the Grails 6 migration.
Resolved SLF4J multiple-binding conflicts caused by commons-logging and Log4j being pulled in transitively. Fixed by globally excluding slf4j-simple, jcl-over-slf4j and slf4j-reload4j in build.gradle.
Resolved ASM version conflicts between Groovy 3, Drools 7 and Spring by globally excluding org.ow2.asm from the dependency tree.
Resolved httpclient version conflict between the main application (httpclient5 5.2.1) and Selenium/WebDriverManager test dependencies, which require an older httpclient5 version. Fixed by excluding httpclient5 and httpcore5 from the webdrivermanager test dependency.
Resolved GSP compilation failures caused by legacy AJAX tag usage — views migrated to standard HTML/JS patterns compatible with Grails 6 GSP.
Resolved DataSource bootstrap ordering issues under Spring Boot, where the Grails datasource bean and the Spring Boot auto-configured datasource bean conflicted. Unified under Spring Boot datasource auto-configuration.
What will stop working when you move from OpenBRM 2.x (Grails 2.4.3) to OpenBRM 26.0.0 (Grails 6.2.2), and what to change.
Framework & Application Model
The Grails application no longer starts with grails run-app. Use ./gradlew bootRun. All startup scripts and CI pipelines must be updated.
The application now boots as a Spring Boot application. The main class is openbrm.Application — any deployment scripts referencing the old entry point must change.
The GSP tag library has changed. Legacy <g:remoteLink>, <g:formRemote> and other AJAX-specific tags no longer exist in Grails 6. All views using them must be updated to standard HTML + JavaScript.
Persistence
Hibernate 4 → 5.4: the implicit naming strategy has changed. Table and column names derived from entity class names may resolve differently. Verify all @Entity mappings and HQL queries.
GORM 4 → 7: dynamic finders and the criteria API have been updated. Test all GORM-based queries, especially those using named queries or DetachedCriteria.
The DataSource.groovy config from Grails 2 is no longer used. Database configuration now lives in grails-app/conf/application.yml. Any external datasource configuration must be migrated.
Web Services & APIs
Apache CXF moves from 2.x to 3.5.9. The WS-Security interceptor configuration API has changed. All CXF bean definitions must be reviewed and updated.
The JAX-WS stack now uses both javax.jws and jakarta.xml.ws namespaces. Mixed-namespace imports will cause ClassNotFoundException at runtime. Consolidate to the correct namespace for each endpoint.
Tomcat 10+ is incompatible with this releaseSpring Boot 2.7.18 uses javax.servlet.*; Tomcat 10 uses jakarta.servlet.*. The bundled Tomcat is locked at 9.0.83 — do not upgrade it without also upgrading Spring Boot to 3.x.
Configuration Changes
Almost every configuration file from the Grails 2 era has changed location, format, or both. The following covers the most important ones.
Primary Configuration File
grails-app/conf/Config.groovy and DataSource.groovy are gone. All configuration now lives in grails-app/conf/application.yml and application.groovy.
application.yml is excluded from the WAR at build time and must sit in Tomcat’s conf/ directory at runtime. The binary distribution ZIP places it there automatically.
Environment-specific config blocks (environments { production { ... } }) are now handled through Spring Boot profiles (spring.profiles.active) or YAML profile documents.
Database Configuration
Replace dataSource { ... } Groovy blocks with Spring Boot datasource properties in application.yml: spring.datasource.url, spring.datasource.username, spring.datasource.password, spring.datasource.driver-class-name.
HikariCP is now the default connection pool. Pool sizing is controlled via spring.datasource.hikari.* properties.
Logging
Log4j and commons-logging have been excluded from all configurations (slf4j-simple, jcl-over-slf4j and slf4j-reload4j are all excluded in build.gradle).
All logging now goes through SLF4J + Logback. Configure via grails-app/conf/logback.groovy or logback.xml on the classpath.
The janino library (3.1.11) is included as a runtime dependency to support conditional Logback configuration.
Deprecations & Removals
Item
Reason
grails run-app startup command
Replaced by ./gradlew bootRun
Config.groovy / DataSource.groovy
Replaced by application.yml
H2 in-memory database
Explicitly excluded — use PostgreSQL
HSQLDB (Hypersonic) in-memory database
Explicitly excluded — use PostgreSQL
Springfox (Swagger 2)
Incompatible with Spring Boot 2.7+ — replaced by SpringDoc OpenAPI
Install OpenBRM 26.0.0 from the binary distribution. Tomcat 9.0.83 is bundled — no separate application server installation is required.
Version 26.0.0 · August 2026These steps replace the OpenBRM 2.x installation procedure. If you are upgrading an existing installation, read Breaking Changes & Migration first — startup commands, configuration file locations and the datasource configuration have all changed.
Requirements
Component
Required
Java
Java 17 — Java 8 is no longer supported
Database
PostgreSQL 18
Application server
Tomcat 9.0.83 — bundled in the distribution
Distribution file
openbrm-26.0.0.zip
Do not upgrade the bundled TomcatSpring Boot 2.7.18 uses the javax.servlet.* namespace, while Tomcat 10+ uses jakarta.servlet.*. Tomcat is locked at 9.0.83 for this release.
Download and Extract
Download the openbrm-26.0.0.zip file.
Unzip the archive into your workspace directory.
Note the extraction path — for example: C:\openbrm\openbrm-26.0.0\openbrm\billing-26.0.0\
No spaces in the pathCreate your workspace directory without any spaces in the folder name. Paths containing spaces break the startup scripts and the OPENBRM_HOME variable.
Package Contents (billing-26.0.0)
billing-26.0.0/
├── bin/
│   ├── startup.bat        ← Start server (Windows)
│   ├── startup.sh         ← Start server (Linux/macOS)
│   ├── shutdown.bat       ← Stop server (Windows)
│   └── shutdown.sh        ← Stop server (Linux/macOS)
├── conf/
│   ├── application.yml    ← Main application config
│   ├── openbrm.properties
│   └── server.xml         ← Tomcat port settings
├── webapps/
│   └── openbrm.war        ← Application archive
├── logs/
└── sqls/
    └── base_database      ← PostgreSQL base database dump
Database Configuration
OpenBRM 26.0.0 requires a PostgreSQL database. Follow the steps below to create the role, create the database and restore the shipped base data.
Step 1 — Log in to PostgreSQL
psql -U postgres -p 5433
If prompted for a password, enter the password set during PostgreSQL installation.
Step 2 — Create the Role
CREATE USER openbrm_demo WITH PASSWORD 'openbrm_demo';
Step 3 — Create the Database
CREATE DATABASE openbrm_db OWNER openbrm_demo;
GRANT ALL PRIVILEGES ON DATABASE openbrm_db TO openbrm_demo;
Step 4 — Log Out of PostgreSQL
\q
Step 5 — Import the Base Database
Navigate to the sqls/ folder and restore base_database into the database using pg_restore:
If prompted for a password, enter the PostgreSQL superuser password. Add --no-owner if you want every restored object to be owned by the connecting user.
Custom-format dumpThe sqls/base_database file is a PostgreSQL custom-format dump containing the complete schema and the seed data required by OpenBRM. It must be restored with pg_restore — it cannot be imported with psql directly.
Step 6 — Verify the Connection
psql -U openbrm_demo -d openbrm_db
Enter the password openbrm_demo when prompted.
Default Database Settings
These are the values shipped in conf/application.yml.
Setting
Value
Host
localhost
Port
5433
Database
openbrm_db
Username
openbrm_demo
Password
openbrm_demo
Change the defaults before production useThe shipped role, password and admin credentials are demo values. Replace them before exposing the instance to anything beyond a local evaluation.
Environment Variables
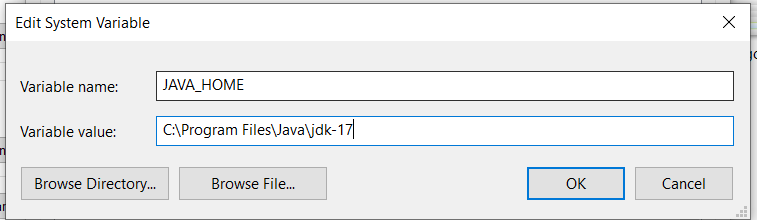
Setting JAVA_HOME
Set JAVA_HOME to point at your Java 17 JDK installation directory. OpenBRM 26.0.0 requires Java 17.
WindowsRestart the command prompt after running setx for the variable to take effect. Adjust the path to match your actual JDK 17 installation location.
You can also set the variable through the Windows GUI: Start Menu > Control Panel > System > Advanced System Settings > Environment Variables > System Variables, then New… or Edit….
Figure 1 The Windows Edit System Variable dialog. For OpenBRM 26.0.0, set the variable name to JAVA_HOME and the value to your JDK 17 directory — for example C:\Program Files\Java\jdk-17. The screenshot dates from an earlier release and shows a Java 17 JDK path.
Setting OPENBRM_HOME
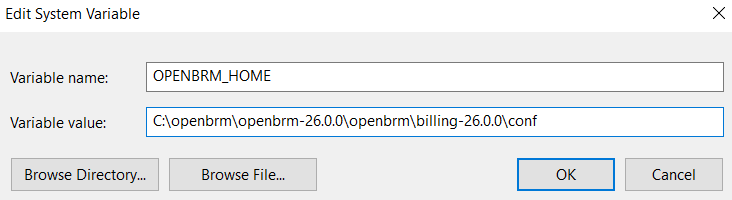
Set OPENBRM_HOME to point at the folder containing the application.yml configuration file.
WindowsRestart the command prompt after running setx. The application.yml file in the conf/ folder is loaded automatically at startup.
Figure 1 The Windows Edit System Variable dialog. For OpenBRM 26.0.0, set the variable name to OPENBRM_HOME and the value to your OPENBRM_HOME 17 directory — for example C:\openbrm\openbrm-26.0.0\openbrm\billing-26.0.0\conf.
Starting the OpenBRM Server
Navigate to the bin directory inside billing-26.0.0 and run the startup script.
Windows
cd C:\openbrm\openbrm-26.0.0\openbrm\billing-26.0.0\bin
startup.bat
Linux / macOS / Git Bash
cd /opt/openbrm/openbrm-26.0.0/openbrm/billing-26.0.0/bin
chmod +x *.sh
./startup.sh
Monitoring the Startup Log
Linux / macOS / Git Bash
tail -f ../logs/catalina.out
Windows (PowerShell)
Get-Content ..\logs\catalina.out -Wait
First startupAllow 60–120 seconds on the first run while Hibernate initialises the database schema.
To stop the server, run shutdown.bat (Windows) or ./shutdown.sh (Linux/macOS) from the same bin directory.
Logging In to OpenBRM
Once the server has started, open a web browser and navigate to:
http://localhost:8080/openbrm
The OpenBRM login page appears. Enter the following credentials:
Field
Value
Login ID
admin
Password
123qwe
From here, follow the Getting Started Guide to set up your company, products and first invoice.
Useful Endpoints
URL
Purpose
/openbrm
Application login
/openbrm/swagger-ui.html
Live API documentation (SpringDoc OpenAPI UI)
/openbrm/v3/api-docs
OpenAPI JSON specification
/actuator/prometheus
Application metrics (Micrometer + Prometheus)
Upgrading from an Earlier Release
Upgrading from OpenBRM 2.x is a platform migration, not an in-place file swap. Before you begin:
Read Breaking Changes & Migration in full — the startup command, configuration files and datasource configuration have all changed.
Migrate Config.groovy and DataSource.groovy settings into conf/application.yml. See Configuration Changes.
Move from Java 8 to a Java 17 JDK and update JAVA_HOME.
Move your data to PostgreSQL — H2 and HSQLDB are explicitly excluded from this release.
Compare your existing configuration files against those shipped with 26.0.0 so that your local changes are carried forward.
Review Dependency Changes for any custom code built against upgraded libraries — especially JasperReports templates, iText, Drools rules and CXF endpoints.
Building OpenBRM from Source
The Grails 2 command grails run-app no longer applies. OpenBRM 26.0.0 builds and runs through Gradle 8:
./gradlew bootRun
The application boots as a Spring Boot application with openbrm.Application as its main class. The build produces both the full binary distribution (openbrm-26.0.0.zip, with Tomcat 9.0.83 bundled) and a WAR-only distribution (openbrm-26.0.0-war.zip) for teams running their own Tomcat.
Hello, and welcome to openbrm! openbrm is a mature product that generates invoices and processes payments for companies of all sizes. Thousands of users across the world are thrilled with the freedom and possibilities this billing and invoicing system provides.
By choosing openbrm, you will save countless hours of tedious, manual work. Some of openbrm’s time-saving features include: invoice generation, following complex business rules and taxes, customer self-care through its web-based interface, and automatic payment processing.
Getting openbrm set up and ready to run does require some effort. Are you going to accept credit cards? How often are your customers going to get invoices? How are they going to receive these invoices? How much time can a customer take to pay an invoice? What happens if a customer doesn’t pay? You know the answers to these questions. Eventually, you will need to let openbrm know so that it can follow your business rules while processing your billing.
The purpose of this guide, however, is for you follow instructions that are designed to help you become familiarized with the basics of openbrm. If you need more information on how to install openbrm, click here.
Get yourself a cup of hot chocolate, be patient, and keep reading! Running openbrm is well worth the effort.
Overview
This guide is made up of the following four sections:
Creating a Company
Entering Your Customer's Data
System Configuration
My First Invoice
The steps provided in these sections will leave you with a better understanding of how to set up and run through openbrm’s billing and invoicing process. Let’s take a look at a high level overview of this process now:
Products represent the goods and services that your company offers. Your customers buy products by placing purchase orders. Periodically, a batch process called the billing process will run and generate invoices based on these purchase orders. Your customers will then pay their invoices by submitting payments, or the system can automatically process these payments through its automatic payment processing feature.
Creating a Company
After you install openbrm you need to create a company before you can use the system.
To configure a Company, navigate to your openbrm home page. The URL should look something like this:
http://localhost:8080/openbrm/login
The key here is to remove all text starting from ‘login’ and replace it with: ‘signup’. For example:
http://localhost:8080/openbrm/signup
Hitting the ‘Enter’ key will refresh to the company sign-up screen. Enter your company information in the appropriate fields. Refer to the steps below as an example:
In the Login Name field enter, admin.
In the First Name field enter, Sarah.
In the Last Name field enter, Wilson.
In the Phone Number field enter, 123-456-7890.
In the Email field enter a valid email address for the Company Super User Administrator. Once the company is saved, the system will send an email with a link for the user to create their password (for example: admin@edgeset.com).
In the Language field select, English.
In the Currency field select, United States Dollar.
In the Organization Name field enter, Edgeset Solutions.
In the Address field enter 123 Street.
In the State/Province Field enter New York.
In the Country drop-down field enter United States.
In the Zip/Postal Code field enter 90456.
Click on the ‘Save Changes’ button. openbrm will refresh to the Login screen, and Edgeset Solutions is now available in the Company drop-down menu.
To login to your company:
Click on the link provided in the email sent by the system. (Please note: if you are running openbrm locally without an email server configured, refer to the instructions below for details on how to retrieve the Reset Password link.)
Create a Password (example: 123qweQWE!). The system will redirect you to the login screen.
Select the company from the drop-down menu and enter valid login credentials.
In the Login field enter, admin.
In the Password field enter your password.
Click on the ‘Login’ button.
Email Instructions:
NoteIt is important to note that when openbrm is run locally without an email server configured, all emails are sent to a file in the Resources folder of the application. Example: C:\Applications\openbrm\openbrm\resources\emails_sent.txt
To retrieve this link and view the Reset Password screen: Copy the applicable link from the email_sent.txt file and paste into the address bar of your browser. In the link, replace the text “www.yourcompany.com” with “localhost:8080”, and press Enter. The Reset Password screen will appear.
For more information on configuring email, please refer to the Notifications chapter of the Community Edition User Guide.
You are now ready to enter information into openbrm. Let's get started!
Entering Your Customer's Data
This section reviews the basic data you will need to enter into openbrm:
Product Categories: These help to group your products.
Products: Represent the catalog of goods or services your company sells.
Customers: These people buy from you, and pay!
Purchase orders: A customer's subscription or purchase from your company.
Order periods: Represents how often your customers receive an invoice.
Product Categories
Product categories are the first thing you need to enter into openbrm. It is possible to create as many categories as you want. Categories help to group products. This grouping will be helpful later on when you run a report, or for invoice calculations.
To Create a Category:
In the navigation pane, Click on the Products tab. A list of categories will appear in the middle pane on your screen.
Click on the ‘+ Add Category’ button. The Add Product Category screen will appear.
Ensure that Items is selected in the drop-down pane beside Type. Please note: The category type lets openbrm know how to treat the products that belong to this category. A regular product should belong to the Items category type.
Enter the category name into the text box beside Name. (Example: Hardware)
Click on the ‘Save Changes’ button to save the category. You will return to the Products screen. Or,
Click on the ‘Cancel’ button to discard the category. You will return to the Products screen.
Products
Products are the catalog of goods and services your company sells. Keep in mind that there are other factors that affect how much your customers pay you, such as taxes or fees. These too must be represented as products.
TO CREATE A PRODUCT
Select the category you created.
Click on the ‘+ Add Product’ button in the Products pane. The page will refresh to the Add Product screen.
Beside the Add Description field, click on the green plus sign ‘+’. The English Description field will appear.
In the English Description field, enter the product name. (Example: Modem)
In the Product Code field, enter the product’s code. (Example: 'M-01') Please Note that this field determines how products will be ordered in an invoice.
Make sure that your category is selected in the Categories pane.
Under Prices, in the text box provided, enter: 100.
Click on the ‘Save Changes’ button. You will return to the Products screen. The newly added product is available in the Products list. Or,
Click on the ‘Cancel’ button to disregard any changes. You will return to the Products screen.
You have probably noticed that several fields in this area have not been addressed. There is also more to learn about the fields described above. For more information, please refer to openbrm's Community Edition User Guide.
Customers
Now that you have something to 'sell,' you need to create an Account Type and Account Information Types (AITs). Then you can create your customers - the individuals or companies that purchase your goods and services.
TO CREATE AN ACCOUNT TYPE
Account Types help you to organize groups of similar customers. The following steps include the minimal information required to configure an account type. For more details, please refer to openbrm’s Community Edition User Guide.
In the navigation pane at the top of the screen, click on the Configuration tab. Preferences and the configuration menu will appear.
From the menu on the left of the screen, select: Account Types. The account types area of the system will appear.
Click on the ‘Add New’ button. A new account type screen will appear.
In the name field, enter the name of the account type (example: Government)
Click on the ‘Save Changes’ button. You will return to the Account Type list screen. The newly added account type will appear in the list. Or,
Click on the ‘Cancel’ button to disregard any changes. You will return to the account type list screen.
TO CREATE AN ACCOUNT INFORMATION TYPE (AIT)
Account Information Types define the fields that will appear on the customer screen when the account type is selected. For more information on this feature, please refer to openbrm’s Community Edition User Guide.
From the Account Type screen, select the Account Type you created. Its details will appear on the right.
Click on the ‘Add Information Type’ button. The Account Information Type area of the system will appear.
In the Name field enter: Email Information.
In the Display Order field enter: 1.
Select the Include in Notifications field.
Click on the ‘Add New Meta Field’ button. The details to configure a meta field will appear on the right.
In the Name field enter: Email.
Select the Mandatory field.
In the MetaField Type drop down select: Email.
In the Validation drop down select: Email.
Beside the Error Message field, click on the green plus sign ‘+’. A field called, English Error Message will appear.
Enter: Please provide email address.
Click on the ‘Update’ button.
Click on the ‘Save Changes’ button. The AIT is saved to the Account Type. Or
Click on the ‘Cancel’ button to disregard any changes. You will return to the Account Type list screen.
TO CREATE A CUSTOMER
In the navigation pane at the top of the screen, click on the Customers tab. The system will direct you to the Customers screen.
Click on the ‘+ Add New’ button. From here, select which Account Type you want to create the customer under.
Click on the ‘Select’ button. The New Customer screen will appear.
The New Customer form contains information about a customer, including any Account Information Type meta fields you configure.
In the Login Name field, enter 'bsmith'.
In the Email field, enter 'bsmith@acme.com'.
Scroll down to the bottom of the screen and click on the ‘Save Changes’ button to create the customer. Or
Click on the ‘Cancel’ button to disregard any changes. You will return to the Customer screen.
More information about this customer, such as organization name, first name, last name, and address, can also be entered by creating additional meta fields in the AIT area of the system (if desired or required).
Purchase Orders
Now that you have a customer, it is time to define how often he or she will be billed, and therefore, how often he or she should pay for the products on a purchase order.
The most common order period is monthly. openbrm however, can handle any number of days, weeks, months, or years as an order period.
Follow the instructions below to create two order periods: one monthly, and one for a three month period.
TO CREATE A ORDER PERIOD
In the navigation pane at the top of the screen, click on the Configuration tab. The configuration area of the system will appear.
From the menu on the left, select, Order Periods. The Order Periods pane will appear.
Click the ‘Add New’ button.
In the value field, enter: 3.
From the Unit drop down list, select Month.
In the Description field, enter: Quarterly.
Click the ‘Save Changes’ button to save the order period. To discard any changes, click the ‘Cancel’ button. You will return to the Configuration screen.
Repeat steps 3 to 4 and enter the following: Value: 1, Unit: Month, and Description: Monthly.
Order Periods
Congratulations! Now that you have a customer and something to sell to them, you are ready to make some sales.
A purchase order in openbrm represents your company’s sales. This could be a one-time purchase or a subscription for which the customer pays regularly (recurring). It might be helpful to think of a purchase order like a shopping bag, full of the many different products that a customer buys.
TO CREATE A PURCHASE ORDER:
From the Customer tab, ensure the customer you created is selected. Their information will display on the right.
Scroll down to the bottom of the page.
Select the ‘Create Order’ button.
Select 'Monthly' from the dropdown list beside Period.
Select 'pre paid' from the dropdown list beside Type to charge the customer in advance for the service. Select ‘post paid’ from the dropdown list beside Type to charge the customer for the services after the period is finished. (For more information on this field, please refer to the openbrm Community Edition User Guide).
Click on the Products tab, located beside the Sub-Orders tab. You will see a list of all products.
Find your product and click on it. The product will appear in the Line Changes pane on the right.
Click the ‘Update’ button. The product is listed in the Review pane on the right. (To remove the product, click the ‘Remove’ button).
Click the ‘Save Changes’ button to save the purchase order. The order appears under the Orders tab. (To disregard any changes, click the ‘Delete’ button. You will return to the Customer screen).
Your new order will now appear under the Orders tab, in the Orders list. From here, you can edit or delete the purchase order by selecting it.
Scenarios
So far, you have been working with simple examples. You might be wondering if other scenarios common to your company can be addressed using openbrm. It is actually very hard to come up with a billing scenario that openbrm cannot handle. Setting up your system is all about good management of products and orders. To learn more, please refer to the openbrm Community Edition User Guide.
Data alone is not enough to run your billing. You also need to tell openbrm about the billing process itself, as well as other system-wide parameters. This guide will briefly address the following aspects in order for you to understand how to run billing:
Notifications
Email Delivery Parameters
The Collection Process
The Billing Process
Invoice Numbering
Payment Processing
For more detailed information on any of the above topics, please refer to the openbrm Community Edition User Guide.
Notifications
Openbrm will notify your customers about various events, the most important one being any new invoice.
To access the Notification area of the system:
Clicking the Configuration tab, and then Notifications from the menu on the left it will reveal four notification categories:
Invoices: Remind your customers that an invoice has been sent to them. They can be sent after an invoice has been generated, and until that invoice is paid or reaches its due date (whichever comes first).
Orders: Remind your customers that their purchase orders will expire on a certain date.
Payments: Let your customers know if their payments have been successful, or if they have failed.
Users: Let your customers know if they have overdue payments, if they have a suspended account, if they have been deleted, if they have lost their password, or if they need to provide updated credit card information.
Email Delivery Parameters
Openbrm will send emails to customers on your behalf for multiple reasons. Sending them invoices is one reason, but reminders, failure to receive a payment, balance overdue, and others, can also be sent. You can opt out of sending any emails, but consider that this service is completely free and, once well configured, will save you a considerable amount of time.
For more information, please refer to the Community Edition User Guide.
The Collections Process
What happens if the due date has come and gone and the customer has not yet paid? This is an issue addressed by the collection process. This process notifies your customers about their overdue invoices, triggers payment retries, and changes the status of that customer’s account.
For example, you might have several steps in your collection process: A grace period, a few payment retries, some reminder notifications and eventual suspension (if the customer still does not provide payment).
TO CONFIGURE THE COLLECTIONS PROCESS
In the navigation pane at the top of the screen, click on the Configuration tab. The configuration area of the system will appear.
From the menu on the left, click on Collections. The collections area of the system will appear.
In the Steps field, enter: Grace Period
In the For Days field, enter: 5
Select the Notification field.
To add another step, click on the green plus sign ‘+’ located at the end of the row. A blank row will appear.
Add the following steps:
Step: Payment, For Days: 10, Select: Payment
Step: Warning, For Days: 11, Select: Notification
Step: First Retry, For Days: 15, Select: Payment
Step: Second Retry, For Days: 16, Select: Payment
Step: Suspend, For Days: 30, Select: Notification and Suspend.
Click the ‘Save Changes’ button to save your Collections Process. Or,
Click the ‘Cancel’ button to return to the main Configuration screen.
The Billing Process
The billing process is the batch process that will generate invoices. Having a good understanding of what it does is important. For more detailed information, please refer to the Community Edition User Guide.
TO CONFIGURE THE BILLING PROCESS
Under the Configuration tab, from the menu on the left, click on Billing Process.
Click the calendar icon in the Next Run Date field and select the date for the first day of next month. Please note: This field automatically updates by the billing process when it runs.
Select the check box beside Generate Review Report.
Enter '3' in the Days to Review Report field.
Enter '1' and select Month for the Billing Period field.
Click the ‘Save Changes’ button. Or,
Click the ‘Cancel’ button to cancel the changes and return to the Configuration screen.
Invoice Numbering
Openbrm will apply the number 1 to the first invoice generated. If, however, your company has generated previous invoices, it is necessary to tell the system about this number so it can properly number the next invoices.
TO CHANGE THE INVOICE NUMBER
Under the Configuration tab, from the menu on the left, click on Invoice Display.
In the Next Invoice Number field, you can change the value to any number you want to start invoicing your customers with.
Click on the 'Save Changes' button to save the number. Or,
Click on the 'Cancel' button.
Payment Processors
This section only applies if you plan on using automatic payment processing (credit cards and direct debit).
When openbrm runs the Billing or Collections Process, it can automatically pay generated invoices with your customers' credit cards or banking information. This allows for several other automation features: payment retries, notification to your customers about the results of their payments (usually via email), etc.
Each payment processor has its own API. In plain English, each payment processor talks a different language so openbrm needs an 'interface' for each of them. openbrm supports many payment processors like, Authorize.net, Sage Pay, and PayPal (to name a few). Creating new interfaces to support other payment processors is not difficult, but it requires the development of a plug-in which is out of the scope of this guide.
You do however, have the ability to add payment methods from openbrm’s user interface. The options are: Payment Card, ACH (Direct Debit) and Cheque.
TO CONFIGURE A PAYMENT METHOD
In the navigation pane at the top of the screen, click on the Configuration tab. The configuration area of the system will appear.
From the menu on the left, select: Payment Method. The payment method area of the system will appear.
Click on the ‘Add New’ button. The option to select a payment information type will appear.
In the Payment Method Template drop down select: Payment Method. The payment method configuration screen will appear.
In the Method Name field enter: VISA.
Select: Is Recurring?
Select: All Account Types.
Click the ‘Save Changes’ button to save your Collections Process. Or,
Click the ‘Cancel’ button to return to the main Configuration screen.
For more information about payments and payment methods, please refer to the Community Edition User Guide.
Congratulations! You have completed learning about some areas of configuration within openbrm. You are now ready to generate invoices.
Generating an Invoice
Invoices are created from purchase orders. This ensures that your customers do not get billed unless they have bought something from you first. Never modify an invoice directly; instead, adjust the purchase order, as they are the templates from which the customer's invoices are generated. The idea is to have a consistent model where you can trace documents and the reasons for their existence.
Even though you have entered a customer and his or her purchase order, you still do not have any invoices. There are two ways to generate an invoice in openbrm:
Billing Process: This is the recommended way to generate invoices. It is an automated process that runs periodically, going through all orders and generating invoices only when necessary.
Manually: It is possible to create an invoice out of the configured order. This is not the way to generate the bulk of your invoices, but it is helpful when you want to create an invoice immediately, instead of waiting for the next billing process to run.
Ideally, you would have already completed entering all your data before you move to generating the invoice. However, this example requires you to edit information for your customer and purchase order first.
Editing Customer Information
Let’s edit some of Brian Smith’s information:
Access the Customers tab.
Click on your customer, Brian Smith. Information will appear on the right.
Scroll down and click on the ‘Edit’ button. Your screen will refresh to the Edit Customer page.
Change the Invoice and Delivery Method to: email and paper.
In the Payment Method pane, Payment Method Type drop down, select: VISA. The associated fields will appear.
In the Processing Order field enter: 1.
In cc.cardholder.name enter: Brian Smith.
In the cc.number field enter credit card number: 4111111111111152.
In the cc.expiry.date field enter: 11/2020.
Click the ‘Save Changes’ button to save the changes you have made. OR,
Click the ‘Cancel’ button to disregard any changes and return to the Customer screen.
Purchase Order Changes
Click on the Orders tab, located at the top of your screen. Find and click on the purchase order you created for Brian Smith. You will be changing or editing this purchase order so that it is only active for six months.
Select the purchase order. A summary of its details will appear on the right.
Scroll down and click on the ‘Edit this Order’ button. The purchase order screen will appear.
Click on the calendar icon beside Active Until and select the date that is six months from today’s date. For example, if today’s date is June 1st, 2012, you would select, December 1st, 2012.
Click on the ‘Save Changes’ button. You will be returned to the Orders screen. Or,
Click on the ‘Cancel’ button to disregard any changes. You will be returned to the Orders screen.
Generate the Invoice
The order is ready! It is now possible for you to create the first invoice. For this example, you will be manually triggering the invoice generation.
Please noteThis is not the recommended way to generate an invoice. If you leave the order the way it is, the next billing process will automatically generate the invoice for you. However, in this example, you want the invoice right now and can’t wait.
TO MANUALLY GENERATE AN INVOICE:
Ensure that the purchase order you have just edited is selected.
Scroll down and click on the ‘Generate Invoice’ button. You will be redirected to the Invoices screen.
Pay the Invoice
Last but not least, you want this invoice paid.
TO PAY THE INVOICE:
On the invoice you selected in the above step, scroll down and click on the ‘Pay Invoice’ button. You will be redirected to the Payments and Refunds screen.
In the Payable Invoices pane, ensure that the button beside your invoice is selected. Please note: It is also possible to review the invoice on this screen by clicking on the View Invoice link, located beside the Due Date column.
Scroll down. You will notice that the total amount of the invoice appears in the Payment Amount text box.
Click on the check box beside Process Payment in Real-Time so that the payment is sent to the payment processor for immediate approval.
Confirm that the credit card screen appears with the customer credit card information already populated in the appropriate fields.
Click on the ‘Make Payment’ button, located at the bottom of the New Payment screen. You will be redirected to the Confirm Payment screen. Please note: This is your last chance to ensure that all the data is correct before it is applied.
Click on the ‘Make Payment’ button located at the bottom of the screen to complete the payment. Your invoice will appear in the Payments and Refunds screen, with a message indicating that you have entered a new payment and it is being processed. Or,
Click on the ‘Cancel’ button. Your changes will not be saved and you will be returned to the Payments and Refunds screen.
What's Next?
Well done! You have just completed the Getting Started guide. As stated throughout, if you require more information or further clarification on openbrm, please refer to the Community Edition User Guide.
Your next stop is the Getting Started - BRMS guide. It covers the usage of rules for rating, complex pricing and product relationship management through a Business Rules Management System (BRMS).
Starting with version 3.1, openbrm provides you with it’s own simple and accessible method for handling custom business logic through the use of easy to manage plug-in extensions. Earlier versions required the use of separate BRMS systems with their own GUI, in particular JBoss/Drools. This required a good deal more technical expertise and while still available to use, it is no longer the default for openbrm. If you wish to read our old BRMS guide which includes examples and information about Drools please click here.
It is important to note that this guide is mostly applicable to the Community Edition. The Enterprise Edition of openbrm already comes with built-in support for complex pricing, plans, and bundles. In the Enterprise Edition, complex pricing is done with pricing models, which are extensible components that encapsulate pricing logic. Plans, and bundles, group and price products in a way that greatly simplifies product management.
This is not to say that plug-ins with custom logic are not used in the Enterprise Edition; they are, but mostly for areas other than pricing and bundling.
There are numerous benefits for openbrm’s decision to run custom logic from plug-ins.
With the business logic contained in the plug-ins, you do not need to change the core code. This means upgrading your logic is a snap and, conversely, you can just as easily upgrade your application without any merges: your custom logic is safely separated in plug-ins.
openbrm stands for ‘Java Billing’. We love Java. Writing custom logic in Java just makes sense.
Your billing system should always reflect your business rules. In many cases, this will lead to ever-increasing complexity for the billing system. For example, it is very common that a product needs more than just a simple flat price. Many factors might need to be considered to determine that price, such as a volume discount, a limited-time promotion, or pricing based on the location of the customer. The possible options are endless.
Another area of a billing system that requires great flexibility is the relationship among products. If you could clearly establish 'commands' to how products relate to each other, then you could implement business rules such as: “if you buy 10 books, you get a free calendar,” or “bundle A includes a book, a calendar, and a poster.”
Those are just two simple examples of what could be a source of great complexity in a billing system. How can your billing system provide you with the necessary flexibility you require to have all your business rules successfully implemented? Using plug-ins allow you to apply operational decisions based on company policy. It also gives you the ability to maintain or modify these rules without needing to change the core code of the application, providing you with increased control over your billing system for compliance and better business management.
This guide is an overview of how to implement these plug ins to easily manage your business logic with openbrm. For more detailed documentation, read the openbrm Extension Guide. If you have not done so, please read the Getting Started/How to Get Started guide that will walk you through the basics of customer and product creation, and how to create your first invoice. This will provide you with an order for B.Smith, once that is in place we can begin.
Meta Fields
Before you begin to implement and make changes to the openbrm plug-in system. It is helpful to know a little bit about meta fields. You will need to implement a meta field before you work with the example plug-in.
Meta fields were introduced first in openbrm 3.1.0 Community Edition. A meta field is simply an extra field you add to a particular form within your billing system. openbrm gives you valuable flexibility by providing you with the ability to create fields in one of five billing areas called “Entity Types”.
Customer
Product
Order
Invoice
Payment
Creating a meta field is easy. For the plug-in example that follows you will need to create the following meta field.
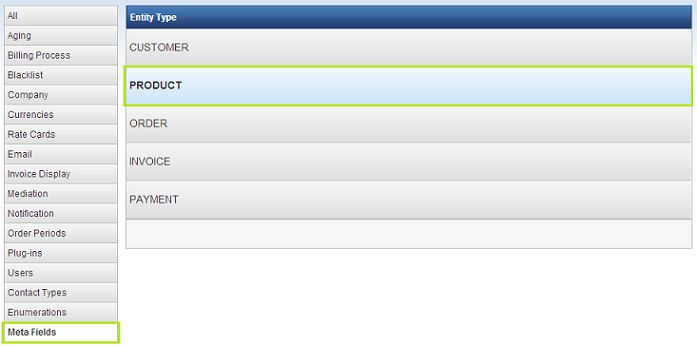
Click on the configuration tab and then in the sidebar on the left click on the meta field option. This should bring up the five entity types we listed above to choose from.
Choose the entity type, “Product”. At this point there will be no meta fields entered so click on the “+ Add New” button on the right to take you to the meta field form.
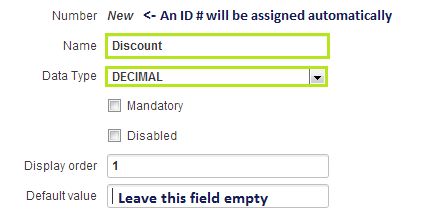
Notice the first field “Number” is listed as “New”. This will be the meta field id # and it will not be assigned until after the meta field is created. You will need this id # for the plug-in example. Please make a note of it.
Fill out the following fields; Name = “Discount”, Data type = “Decimal”, and Display Order = 1. Leave Default Value blank.
Ensure the check boxes Mandatory and Disabled are not selected and click Save Changes.
Figure 1 Configuration → Meta Fields. The five entity types are listed on the right; choose PRODUCT.
Field
Value
Number
New <- An ID # will be assigned automatically
Name
Discount
Data Type
DECIMAL
Mandatory
Not selected
Disabled
Not selected
Display order
1
Default value
Leave this field empty
Figure 2 The meta field form filled in for the Discount field. Number stays as New until the field is saved.
You should be back at meta field configuration page. If you like, you can go back to the product creation page to see that your newly created field “Discount” is now part of the product creation form. You will be using the information in this field in our next example.
The Plug-In System
To make your billing system as easy to use as possible openbrm has implemented a system of plug-ins based on Strategy and Chain of Responsibility designs. This allows you to create the steps needed, (using the plug-ins provided or plug-ins you create yourself), that your business rules require and excluding those that do not apply. For example, you might normally add all products ordered to your invoice but then have a series of taxes such as federal, state, local and maybe a VAT, (Value Added Tax), at the end. You would simply select and configure the plug-ins needed to create the tax rules and openbrm will take care of the rest. Let’s walk through a particular example to show you how simple business rules can be established, managed, and maintained.
The example we will use is a basic product discount rule. You will create and maintain a category of products you wish to sell at a discount. You should have already created a customer called B.Smith along with a product and category. You will now add a new category for discount products, modify it, and apply your discount rule by implementing a supplied plug-in.
Create a new category of products called “Discount products”. Within that category create a product called “Discount Banners”. You will see your new Discount Meta Field; For now continue to keep the meta field “Discount” blank. Keep track of the category id # as you will be needing it soon.
Click on the configuration tab at the top of the screen and then click on plug-ins on the left side bar. This brings up a full list of all installed plug-ins. Changing any of the pre-installed plug-ins without a full understanding of what they do may result in unwanted results so please be careful.
Figure 3 The Configuration tab at the right-hand end of the main navigation bar.
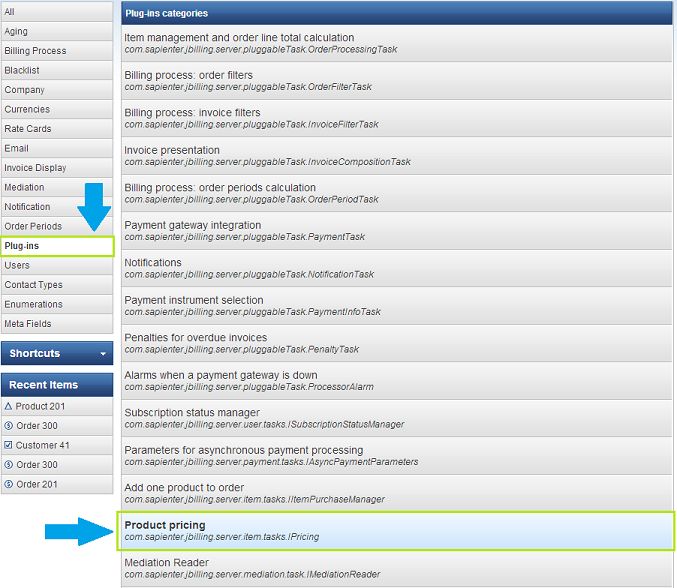
Take a moment to click on at least one of these plug-in categories. You will see some pre-installed plug-ins displayed to the right. Click on any of these displayed plug-ins to bring up a detailed description of what that plug-in does.
In the list of plug-ins categories you will see a category called “Product Pricing”. Click on it to highlight this category. There is no default plug-in implemented yet but we will install one now by clicking the “+ Add New Button” that will be on the right. This should take you to the plug-in page.
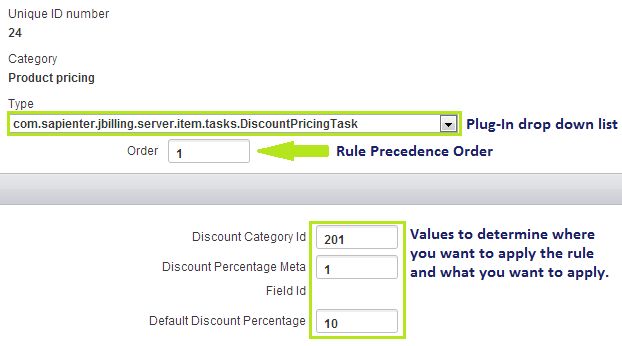
You will see a drop down list with several similar sounding plug-ins. Select the one ending with “.DiscountPricingTask”.
Once selected you will see a list of windows to fill in. These are the parameters needed to provide openbrm with the right information to implement your new rule. Different Plug-Ins will require different fields.
The first box is labeled “Order” and this allows you to determine the order in which the rules will be applied. Please enter "1" here.
The next parameter is the Discount Category ID box. Please enter the category id number you have for the “Discount products” category. This will apply the discount to that category of products
You can now define the discount percentage at the product level using a meta field by entering the meta field id and enter 10 in the “Default Discount Percentage” box. Whole numbers here represent the percentage amount so 10 = 10%. Your fields should look like this.
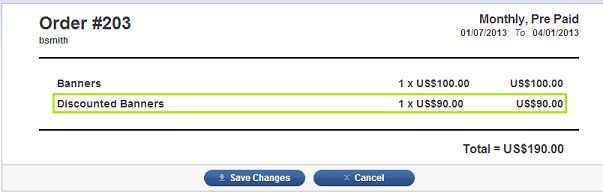
Now, return to use that category and you will see the prices in the product category have not changed, but when applied to an order, the price has been reduced by 10 percent.
Plug-ins categories
Figure 4 The plug-ins categories list. Meta Fields and Plug-ins sit in the left sidebar; Product pricing is the category used in this example.
Figure 5 DiscountPricingTask configured against the Discount products category, with a default discount of 10%.
Field
Value
Unique ID number
24
Category
Product pricing
Type
com.sapienter.jbilling.server.item.tasks.DiscountPricingTask (Plug-In drop down list)
Order
1 (Rule Precedence Order)
Discount Category Id
201
Discount Percentage Meta Field Id
1
Default Discount Percentage
10
Values to determine where you want to apply the rule and what you want to apply. On Order #203 (bsmith, Monthly, Pre Paid) the line Banners is 1 x US$100.00 = US$100.00 and Discounted Banners is 1 x US$90.00 = US$90.00, for a Total = US$190.00.
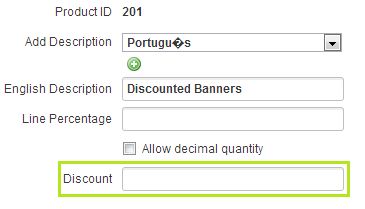
Figure 6 Order #203 for bsmith. The catalogue price is unchanged, but the discounted product is priced at US$90.00 on the order.Figure 7 The Discount meta field on the product form. A value here overrides the plug-in default for that product.
Also, you may now go and add new products or edit pre-existing ones and, in the discount meta-field, determine individual discount prices for those particular products. Try this out by entering 15 in the “Discount” meta field, and you will see it overrides the default value of the plug-in.
Even simpler you can skip the meta field entirely. Just use the plug-in directly as a default value for your entire discount line of products. This takes away your ability to modify individual products, but it does help you see just how flexible and scaleable openbrm’s plug-in system can be. Including your own plug-ins you build in Java can help your billing system grow even further providing you with ultimate customization.
As you can see, there is a lot you can do with this simple plug-in that is provided mostly just as an example. The best part really is that you have the source of the plug-in. You can change it, enhance it, extend it, or create a new one entirely, all in Java. This is open source enterprise billing software at its best.
Openbrm provides you with the tools you need to implement all your business rules quickly and easily, without needing to change core code. You simply chain together the list of plug-ins to generate the invoices you need.
OpenBRM 26.0.0 runs on PostgreSQL 18. Datasource settings live in application.yml, connections are pooled by HikariCP, and persistence runs on Hibernate 5.4 with GORM 7.
In-memory databases removed in 26.0.0H2 and HSQLDB (Hypersonic) are explicitly excluded from this release. The bundled distribution no longer ships with an embedded database — a PostgreSQL instance is required before the application will start.
The Grails 2 configuration model is gone. DataSource.groovy has been replaced by Spring Boot datasource properties in application.yml, and the C3P0 connection pool has been replaced by HikariCP. See Configuration Changes for the full list.
Datasource Configuration
At runtime the application reads application.yml from the folder pointed to by OPENBRM_HOME — in the binary distribution this is billing-26.0.0/conf/. The file is deliberately excluded from the WAR at build time so that deployments can be reconfigured without rebuilding.
Connection poolingHikariCP 3.2.0 is the default pool, replacing C3P0. Pool sizing and timeouts are controlled through the spring.datasource.hikari.* properties. The values above are illustrative — tune them for your workload.
JDBC Driver
The PostgreSQL JDBC driver moves from 9.4-1202-jdbc41 to 42.6.0 in this release. That is a large version jump: review your JDBC URL parameters and SSL settings, as defaults and accepted parameters have changed between those driver generations. The driver is packaged with the distribution — you no longer need to copy a JAR into the application server’s lib/ folder.
Hibernate & GORM Behaviour Changes
Hibernate 4 → 5.4: the implicit naming strategy has changed. Table and column names derived from entity class names may resolve differently than they did on Grails 2. Verify all @Entity mappings and HQL queries against the restored schema.
GORM 4 → 7: dynamic finders and the criteria API have been updated. Test all GORM-based queries, particularly named queries and DetachedCriteria usage.
The Hibernate dialect no longer needs to be set by hand for supported deployments — Spring Boot auto-configuration resolves it from the datasource. Datasource bootstrap ordering between the Grails bean and the Spring Boot auto-configured bean has been unified under Spring Boot.
Database Initialization
The multi-file openbrm-schema*.sql / openbrm-data.sql procedure used in OpenBRM 2.x has been replaced. The 26.0.0 distribution ships a single PostgreSQL custom-format dump at sqls/base_database containing the complete schema and all seed data.
Create the role and database:
CREATE USER openbrm_demo WITH PASSWORD 'openbrm_demo';
CREATE DATABASE openbrm_db OWNER openbrm_demo;
GRANT ALL PRIVILEGES ON DATABASE openbrm_db TO openbrm_demo;
pg_restore is requiredBecause base_database is a custom-format dump rather than plain SQL, it cannot be imported with psql. Add --no-owner to pg_restore if you want all restored objects owned by the connecting user.
Full step-by-step instructions, including the default connection settings, are on the Installation page. Once the database is restored, start the server and log in at http://localhost:8080/openbrm with the admin account.
Schema migrationsLiquibase moves from 3.2.3 to 4.23.2 in this release. Run validate before applying migrations against an existing database. The Spring Batch JobRepository schema has also changed with the upgrade to Spring Batch 4.3.9.
Database Compatibility
Historical referenceThe compatibility chart below dates from the OpenBRM 2.x era, when the platform was database-vendor agnostic. OpenBRM 26.0.0 targets PostgreSQL 18; H2 and HSQLDB are explicitly excluded, and no other vendor is validated for this release. Treat this section as background on the vendor landscape, not as a list of supported options.
There are many factors to consider when selecting which database engine to use for a critical application such as a billing system. You'll need performance, scalability, and security. Although openbrm will run on a wide variety of engines, it doesn't mean you can switch from one to another easily. This is mostly a one-time decision you have to make before you install openbrm, but remember that once you're up and running on your chosen database, switching to another can be very difficult.
Please note that openbrm has not been equally tested on all supported database vendors and engines. We “support” all of the following vendors, but that only means that we provide initialization files to get openbrm up and running, not that we have fully tested the systems, or that we give any kind of guarantee of performance or stability.
We need your help to keep this chart updated. Let us know about your experience with any of these databases, whether good or bad. For additional notes on a particular engine, see the bottom of this page.
Database Vendor
Compatibility
Comments
DB2
Red
openbrm's table names may exceed the maximum length supported by DB2.
Hypersonic (HSQLDB)
Removed
Excluded from OpenBRM 26.0.0. In 2.x this was the default engine, but it was meant only as an example. Hypersonic does not support “read-committed” transaction isolation and therefore reliably cannot handle concurrent access.
Microsoft SQL Server
Yellow
There are some companies using MS SQL Server with success. We are not very familiar with it here at openbrm, which makes it harder for us to evaluate its compatibility.
MySQL
Yellow
There are large deployments of openbrm powered by this database, however MySQL does not support nested transactions. Failure of MySQL to fully rollback a nested transaction can leave openbrm in an inconsistent state after a crash or run-time exception. For more information, please read the MySQL Database Guide.
Oracle
Green
A great choice if budget is not an issue. Companies can easily scale up to meet growing needs.
PostgreSQL
Supported
The supported database for OpenBRM 26.0.0 (PostgreSQL 18). Free, open-source and very stable; OpenBRM has been implemented on PostgreSQL with companies of all sizes without any issues.
Sybase
Red
Removed = Explicitly excluded from the OpenBRM 26.0.0 build.
Red = We are not aware of any production installations using this database.
Yellow = Some instances of openbrm are known to be running using this database, but not for long enough or in a big enough context for us to be fully confident of its compatibility. May also indicate some known issues with this database vendor (see comments above).
Green = Thoroughly tested, known to perform well in demanding scenarios.
Additional Notes (Legacy Vendors)
OpenBRM 2.x referenceThe notes below apply to the vendor-agnostic 2.x schema scripts (openbrm-schema-*.sql), which are not part of the 26.0.0 distribution. They are retained for teams maintaining or migrating from an older installation.
The data to initialize the database includes '&' characters, which is a reserved symbol for sqlplus. Use 'set define off' to skip prompting for '&' values.
sqlplus> set define off;
Use NUMBER(1,0) instead of BIT
Edit the openbrm-schema-oracle.sql schema script and change all instances of BIT to NUMBER(1,0)
Legacy Retained for OpenBRM 2.x installations. MySQL is not a supported database for OpenBRM 26.0.0.
Not applicable to OpenBRM 26.0.0This release targets PostgreSQL 18. The openbrm-schema-mysql.sql script referenced below is not part of the 26.0.0 distribution, which initialises from a PostgreSQL custom-format dump instead. See the Database Guide for current instructions.
Use the MyISAM database engine instead of InnoDB
The InnoDB engine does not support nested transactions and will cause the scheduled billing process to fail. The problem is that data created in the transaction in the beginning of the process is unavailable to until the billing process completes and the transaction ends. This means that statistics, billing process records, and other data is missing when the billing process goes to look for it. The only solution is to use MyISAM which has no transaction support whatsoever - or to use a database that fully supports nested transactions.
Set the engine to MyISAM for your mysql client session before loading openbrm-schema-mysql.sql:
mysql> SET storage_engine=MyISAM
WarningWhen using MyISAM the database will be left in an inconsistent state if the billing process fails. Any transaction that fails will not be rolled back.
Return NULL for null date/time values instead of 0
zeroDateTimeBehavior=convertToNull
Add the above parameter to your JDBC connection URL. MySQL accepts parameters from the JDBC driver by parsing them out of the connection URL in the format:
According to the MySQL documentation, if a schema is created while in the “MaxDB” mode all TIMESTAPS will be considered DATETIME types.
To enable MaxDB mode, set the MySQL mode at startup using the "--sql-mode=MAXDB" command line option, or by setting the global variable “sql_mode” to MAXDB at runtime:
mysql> SET GLOBAL sql_mode=MAXDB;
Edit the openbrm-schema-mysql.sql schema script and change all instances of TIMESTAMP to DATETIME.
One of openbrm's best features is that it can be configured to fit the needs of your country. All it takes to translate openbrm is to get the text in two files translated. In this guide, we'll go though the steps to add a new language to openbrm. You do not need to know any programming to get this done; you just need a text editor and, of course, knowledge of English and the new language you wish to add. Here are the steps:
Download this file
Open the file with a text editor, and translate it. Do not translate the keys (what is to the left of the '='), but the content (what is to the right of the '=').
Save the file with a new name. The name has to be ApplicationResources_XX.properties. Replace XX for the language code you have translated to. See here a list of language codes (under the column ISO 639-1).
Download this file.
Open it with a text editor. Search for the line that starts with '<Language.' Copy and paste that line, replacing the code with the code you found in step 3, the Description with the name of the language, and the ID with a new ID. Please note that there can only be one language with the same ID, so you need to add 1 to the latest language. For example, if Spanish is the last one and has id=3, your language will be id=4.
Search for the first line starting with '<InternationalDescription.' There is a large block of these lines (about 800 of them) for English (language=1). You need to copy and paste them. Replace the 1 in LanguageId="1" with the ID of the new language that you entered in the previous step. Translate all of the text in the 'Content' field.
Save the file.
Send both files to openbrm-developers@lists.sourceforge.net
Now, you can wait for the next openbrm release to see all of the text at work. You can also build openbrm from source to apply the new language (there is documentation for this), or you can ask the developers (same email address where you sent the file) to do this for you and send you a new version of openbrm.
openbrm can submit payments to virtually any payment gateway in the world. For this to happen, however, you need a payment processor plug-in that handles the payment requests to the gateway.
The following are configuration instructions for the plug-in that integrates with Intrannuity. The configuration for any other gateway is very similar, so you can use these instructions as an example.
Payment Processor
Value
Organization
Intrannuity, LLC
URL
http://intrannuity.com/
The Intrannuity payment plug-in can be used to securely process credit card transactions. To enable the plug-in, follow the steps below:
Merchant Account Request
Before you can process any transactions via plug-in, you must setup a merchant account with Intrannuity. Apply for the merchant account using this link: http://intrannuity.com/apply.html
Once your request is submitted, the Intrannuity staff will contact you and will guide you through the merchant signup process. Upon completion, you will be given a Merchant Account Code and Password necessary to configure the plug-in and to process credit cards.
Configuring Plug-In Within openbrm
The next step is to configure the plug-in. Log into openbrm:
Select 'System' and then 'Plug-ins' in the main menu.
Once the form appears, click on the link at the bottom that says 'Add a new Plug-in.' This will create a new row in addition to any already existing rows for plug-ins.
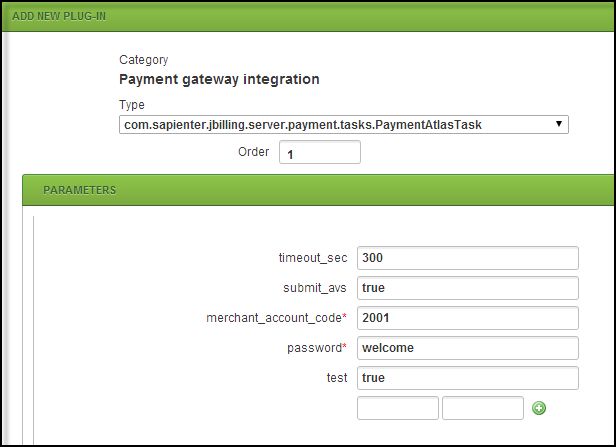
In the new row created, select as type 'com.sapienter.openbrm.server.payment.tasks.PaymentAtlasTask.'
Click on 'Add parameter' below the new task five times. Refer to Figure 1 below.
The following parameters must be setup:
1) MERCHANT_ACCOUNT_CODE - VALUE PROVIDED BY INTRANNUITY
The merchant account code is used to track transactions associated with a specific merchant. This is a required field. Replace ‘parameter_name’ with ‘merchant_account_code’ and ‘default’ with the value provided by Intrannuity.
2) PASSWORD - VALUE PROVIDED BY INTRANNUITY
The password is used in combination with the merchant account code to facilitate the authorization process. This is a required field. Replace ‘parameter_name’ with ‘password’ and default with the value provided by Intrannuity.
3) SUBMIT_AVS - TRUE/FALSE
The parameter indicates whether you want track data and cvv2 values to be sent during the transaction authorization. These values are not required, but they are highly recommended to reduce the possibility of fraud and to lower your transaction processing fees. Replace ‘parameter_name’ with ‘submit_avs’ and ‘default’ with either ‘true’ (recommended) or ‘false’.
4) TEST - TRUE/FALSE
The test parameter indicates whether the transactions are processed via a real production server or via a staging server, which duplicates all functionality of the production server but doesn’t perform any charges. The test mode should be used for testing purposes only to ensure that everything is configured correctly before going live. For live transactions, this value should always be false. This field is required. Replace ‘parameter_name’ with test and ‘default’ with ‘true’ (test server) or ‘false’ (production server).
5) TIMEOUT_SEC
The 'timeout_sec' parameter indicates the time in millisecond before a transaction is timed out. Replace ‘parameter_name’ with 'timeout_sec' and ‘default’ with a value in milliseconds. This field is required. The recommended value is 180000 milliseconds (3 minutes).
Fig 1: Plug-in
Below is a sample test configuration:
Figure 1 Sample test configuration of the Intrannuity payment plug-in. Fields marked * are mandatory.
Be sure to remove the task 'com.sapienter.openbrm.server.pluggableTask.PaymentFakeTask.' This is supplied as a default transaction processing plug-in which doesn’t actually process any charges.
Completion
You are now ready to use openbrm to process transactions with Intrannuity’s Payment Gateway. Additional fraud protection and transaction-validation filters can be configured for your account using Intrannuity’s gateway management portal.